Backstory
I have been a vim user for a while now ,mainly because I can’t exit it, however, I’ve never really gotten into customizing it. Until recently, I’ve never used plugins and my .vimrc is a very simple file with only annoyances fixes such as tabsize=4 and shiftwidth=4.
But since I use vim almost every day (in terminal and also in VS Code as a plugin), I figured I should customize the vim in terminal to be more useful. And before I knew it, I’m almost replacing VS Code with vim. In fact, this article was also written entirely in vim!
My current setup is HomeBrew’s Vim 9.0 on macOS Monterey.
Vanilla vim configurations
Let’s start off with configurations that do not require plugins. Vim configurations can be defined in the file named .vimrc in the current user’s home folder.
Basic settings
When I started out with vim I’ve had these settings.
" Show line number
set nu
"set relativenumber

" Tab size and tab-to-space
set tabstop=2
set shiftwidth=2
set expandtab
nu is for line number and is a shorthand for number. Line number is very useful, and it is the default behavior of almost all text editors. So it’s a no brainer to enable it here too.
Relative number shows the line relative to the line your cursor is on, this is useful if you jump to nearby lines a lot. However, I’ve recently disabled it. Also, if you have relativenumber enabled with number, the current line will be the actual line number while the surrounding lines are relative.
tabstop and shiftwidth is for setting the tabsize in the editor. I used to use 4 but now I use 2 to maximize the amount of text on screen.
Shortcuts
Save as superuser
Let’s say sometimes you edit a superuser file without running vim as superuser and then you come across this:
E45: 'readonly' option is set (add ! to override)So you did the :w!. Then this happens:
/path/to/file E212: Can't open file for writingThen you Google ‘how to save as superuser vim’, then you found this command:
:w !sudo tee % > /dev/nullNow that works nicely. However, having to type that every time might be inconvenient so lets add it as a shortcut.
" save as superuser
command W :execute ':silent w !sudo tee % > /dev/null' | :edit!
command WQ :execute ':silent w !sudo tee % > /dev/null' | :q!
The command command in vim takes in {cmd} and {repl}, which are command and replacement respectively. Now if you’re familiar with shell’s alias you probably know where this is going. The command defined with command works as alias. In the example above I defined W to save as superuser and WQ as save and quit. The :edit! lets vim continue editing after saving as superuser and :q! quits vim.
Cosmetics
Colorschemes
We can’t talk about customizations without colorschemes. There are several colorschemes pre-installed and you can apply them by using the command colorscheme. You can also add more colorschemes which will be stored at ~/.vim/colors/. In my case, I installed darcula theme from https://github.com/doums/darcula. To install this theme, copy the darcula.vim from the repo to ~/.vim/colors/ and put this line in .vimrc:
colorscheme darculaHiding stuffs
When using vim, the end of buffer character will be represented by tilde ~, for cosmetics reasons I hide it by setting the color of end of buffer character to the color of the background. Note that this won’t work with some colorschemes.
highlight EndOfBuffer ctermfg=bgAlso when working with multiple windows in vim, the vertical separators are represented by multiple | characters. to remove that we can set fillchars to be a spacebar (in the code spacebar has to be escaped).
set fillchars+=vert:\ Plugins
Now for the part that makes vim behaves more like modern text editors: plugins.
Originally, I didn’t plan to use plugins since I wanted to keep my vim minimal. However, I decided to try things out and now I have 5 plugins installed.
I use dein for plugin management.
To install plugins add call dein#add([plugin-path]) to your .vimrc then run call dein#install() to install any added plugins (can be multiple plugins).
Emmet
One of the things I like about doing web development in VS Code is emmet. Which is installed by default on VS Code. with emmet you can write short representations of html and hit tab to turn it into full html tags. For example, to write:
<ul>
  <li></li>
  <li></li>
  <li></li>
  <li></li>
</ul>
you can write ul>li*4 which means 4 <li> tags in <ul> tag. To get this functionality in vim however, a plugin is needed.
Luckily we have emmet-vim that does just that. To install emmet-vim, add call dein#add('mattn/emmet-vim') to your .vimrc
The default shortcut for expanding emmet expressions is <C-y>, (CTRL+y followed by a comma) which might be kind of slow. However, we can set it to be another key. Personally I set it to the tab key by adding the following to .vimrc:
imap <expr> <tab> emmet#expandAbbrIntelligent("\<tab>")Now my vim installation has emmet enabled and it works just like in VS Code!
NERDTree
NERDTree is a file browser, which is an alternative to the default netrw. The only inconvenience I find with NERDTree is that it doesn’t support reading network file. However, I find it easier to use than netrw and has a nice help page. I also configured netrw for when I need to read files over network.
To install NERDTree add call dein#add('preservim/nerdtree') into .vimrc and run call dein#install() in vim.
To toggle NERDTree run :NERDTreeToggle in vim. I have that mapped to ⌘+b in iTerm 2 so it behaves almost like VS Code.
Since I plan to use NERDTree as a sidebar, I configured vim to close if NERDTree is the last buffer remaining.
" close vim if NERDTree is the last buffer
autocmd bufenter * if (winnr("$") == 1 && exists("b:NERDTree") && b:NERDTree.isTabTree()) | q | endif
Devicons
Who doesn’t like some icons?
Icons can be useful by letting you know what file type you are dealing with without needing to look at the file extensions. It is also just pretty!
You can get devicons by installing vim-devicons. By adding call dein#add('vim-devicons') to your .vimrc and run call dein#install().
vim-devicons will work with any plugins that supports it. You also need nerd font compatible font to be able to see the icons. I use the patched Fira Code font to get both ligatures and icons. On a macOS systems with HomeBrew, you can install that by running brew install font-fira-code-nerd-font. For other fonts or systems, checkout https://www.nerdfonts.com/ for reference.
Below is NERDTree with devicons:
Code Completion
One of the most important features in modern code editors is code completion. Code completion predicts what you’re writing and can also correct you in casing. Most GUI-based code editors have it on by default but vim doesn’t. Luckily there are plugins for that. I use CoC (Conquer of Completion) for my setup.
To install it add call dein#add('neoclide/coc.nvim', { 'merged': 0, 'rev': 'release' }) into your .vimrc and run the call dein#install() as usual. You also need Node JS version >= 12.12 so make sure you have that installed.
CoC by default comes without language servers so you would need to install them as well. To install a language server run :CocInstall [language-server-name] in vim. The ones I use are coc-html, coc-vue, coc-vetur, coc-tsserver, and coc-phpls. Most language server names are self explanatory, however coc-tsserver is for both JavaScript and TypeScript.
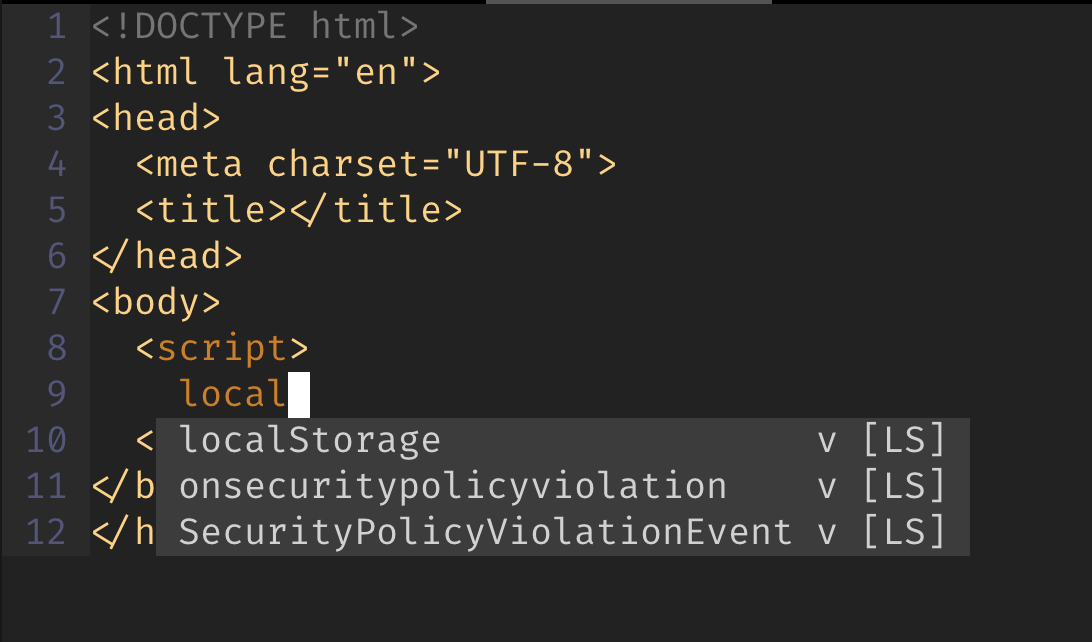
Code completion will appear as a small window that appear as you type, just like in VS Code.

Vim Airline
vim-airline is a status bar plugin which provides you useful information such as filename, mode, filetype, encoding, etc. at the bottom of your buffer screen. vim-airline also supports vim-devicons!
Install by adding call dein#add('vim-airline/vim-airline') and run call dein#install() in vim.

The Whole Setup
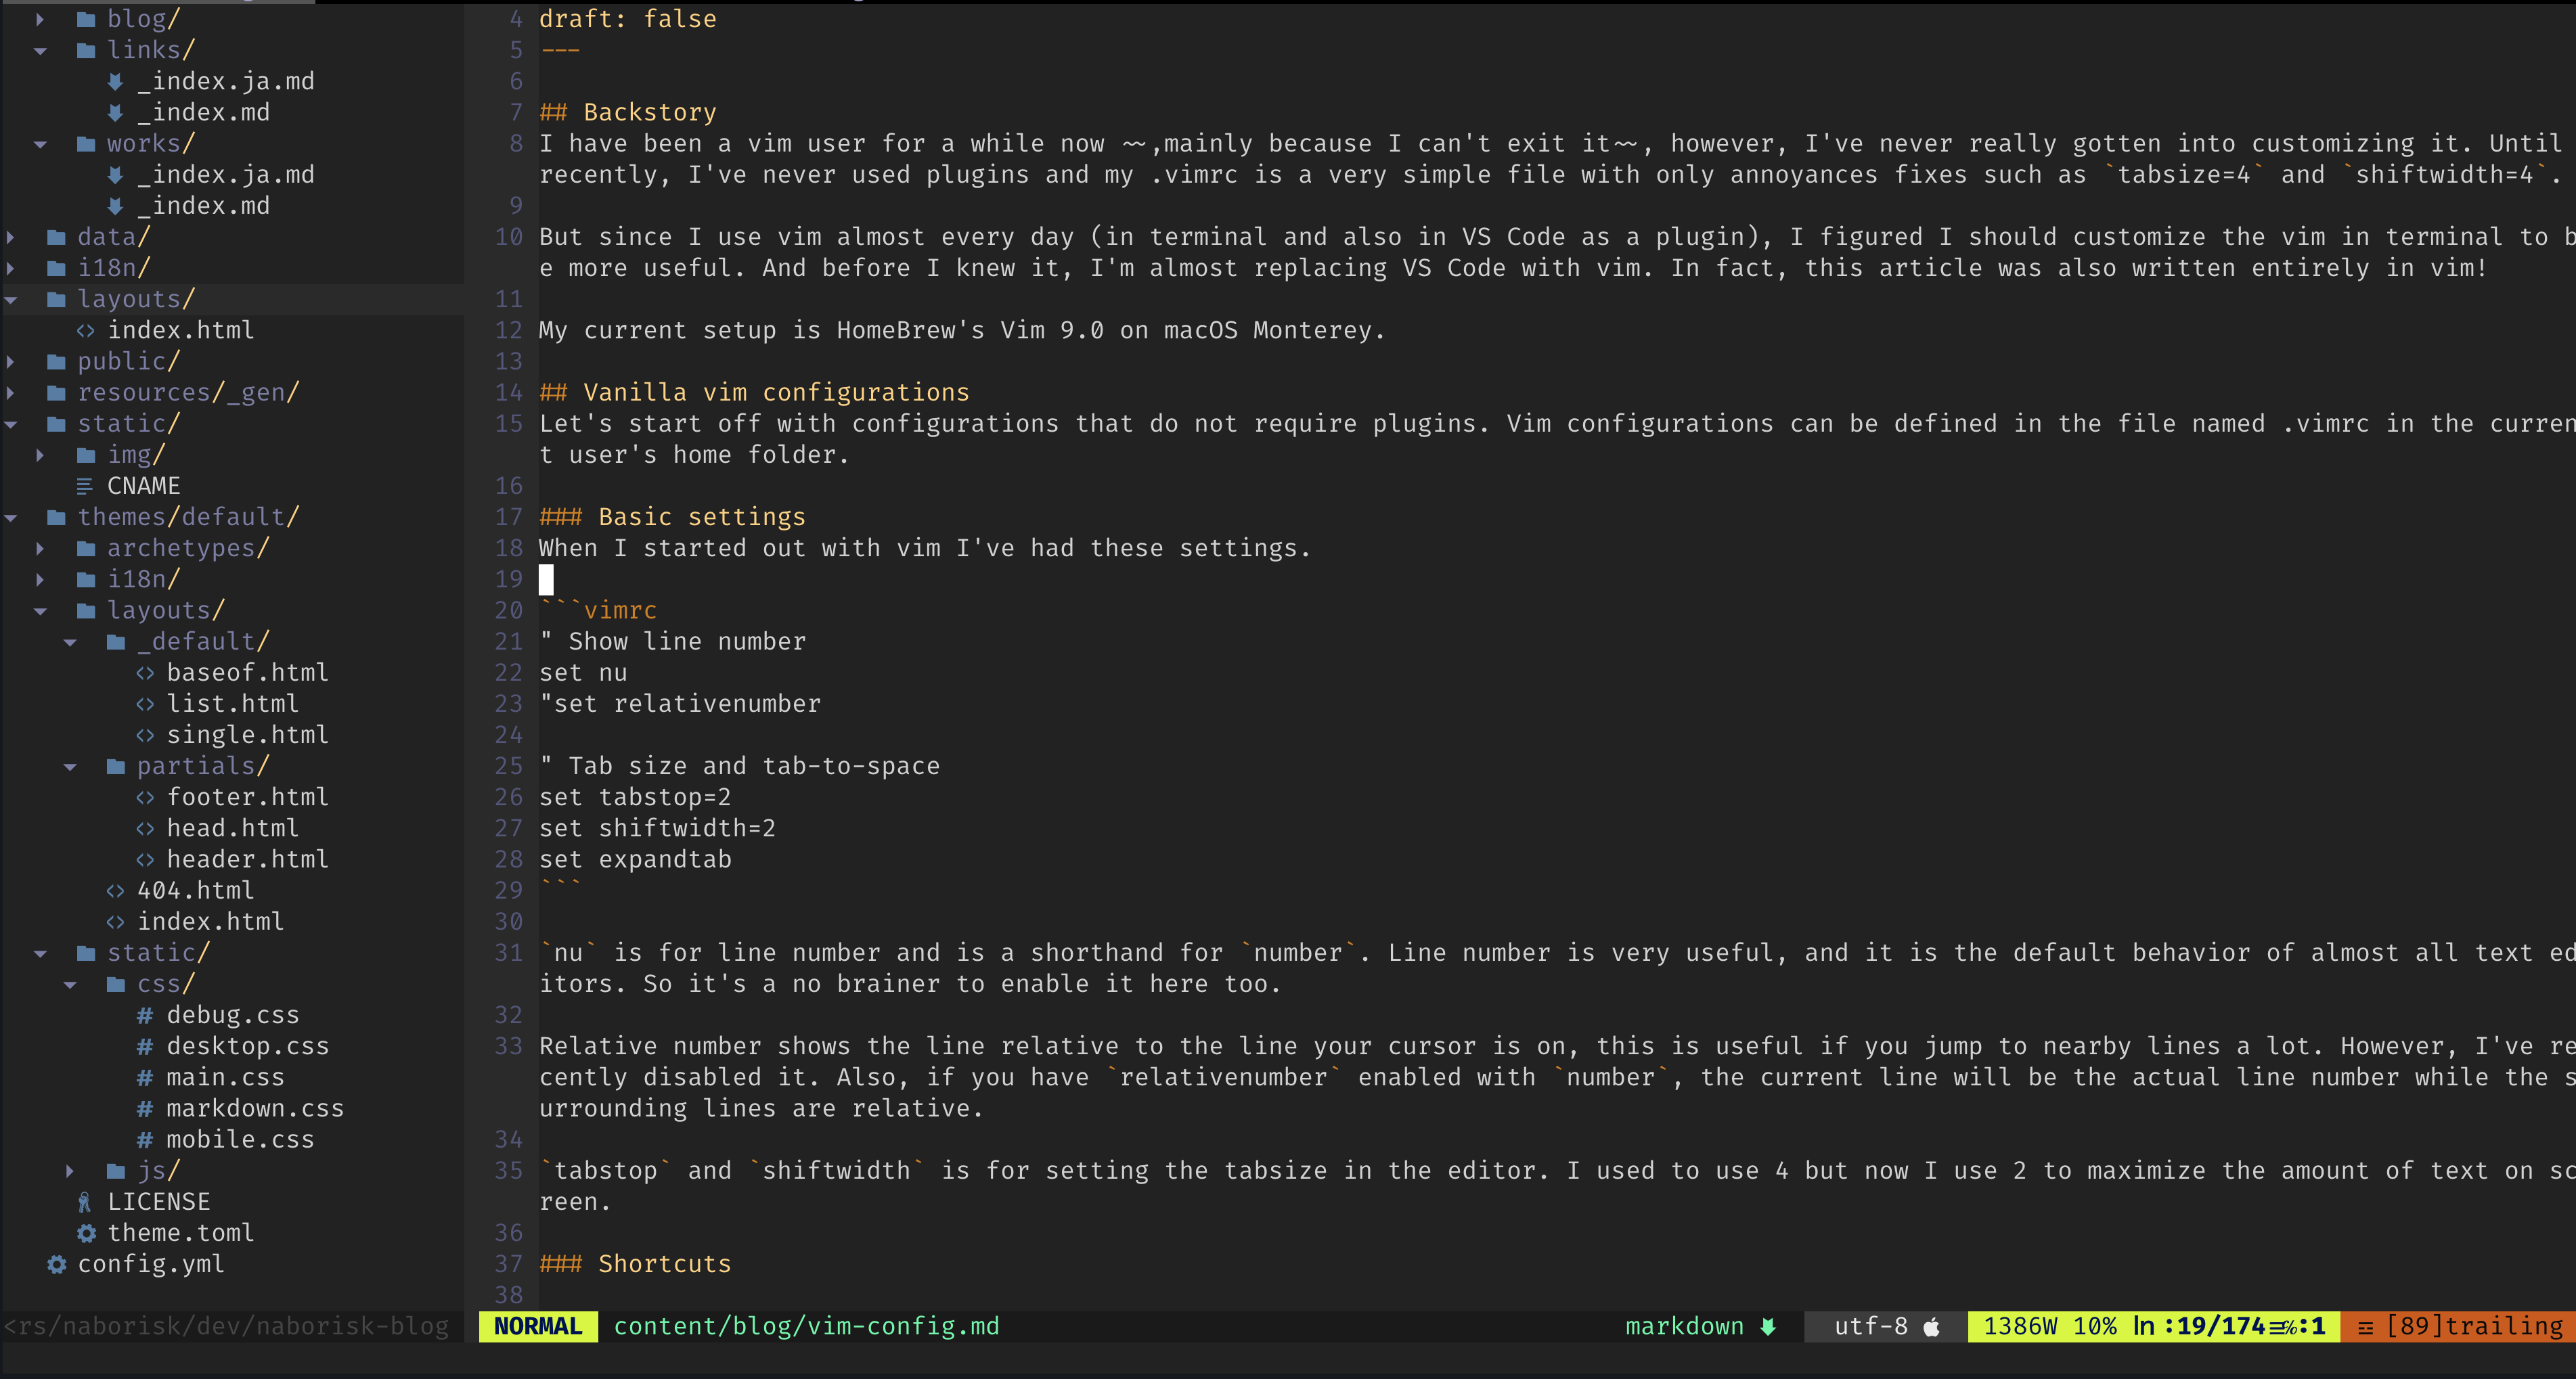
This is what my vim currently looks like:
